Stir Fry

Since I’m doing Weight Watchers (and so is my husband finally!), having vegetables and fruits is a must. They’re zero points, which means I can load up lunches and dinners with them without overdoing it on points.
The easiest meal to make that includes lots of veggies is a stir fry. In a previous post, I talked about 3 ways to add more vegetables to meals and even showed how I added them to stir fry. It’s always a delicious meal, so I thought I’d share my secret. My recipe is inspired by an infographic I found on Pinterest. Yes, it’s true. Of course, I added my own twist to it.
My favorite part is the list of stir-fry sauces:

To make the sauce pretty much zero points, I use Stevia (3 packets) instead of brown sugar. I’ve tried the basic sauce and the black pepper sauce (super spicy!), and I always add red pepper flakes. I’ve done chicken, pork, and steak. All good. And when I do steak, I grate some fresh (well, actually frozen) ginger.
I don’t own a wok, so I don’t follow the exact cooking instructions on the infographic either. I usually mix up the sauce while I’m defrosting the meat. Then, I slice up the meat and add it to the sauce to marinate while I get some rice cooking. I add a little oil to the pan (and more red pepper flakes :)), and heat it up a little before adding the bowl of meat and sauce. Once it starts bubbling, I stir it, lower the heat a little, and cover it to let it simmer. That’s when I prep the veggies I’m going to add. Last time, I put some carrots and romaine into my Ninja and chopped them up. I also threw in a couple frozen shredded zucchini cubes and, of course, my go-to stir-fry veggie: broccoli slaw. I generally wait to throw in the vegetables until the meat is pretty well done. Then I mix everything up, make sure everything is covered with the sauce, and I cover the pan again. I check on it every few minutes, stirring it around a bit, and then covering it back up. I keep it on low heat until the other parts of the meal (like the rice) are done. Simple and delicious!
So give the infographic a try, and make some stir fry. You can go directly to Cook Smarts and get a nice printable version for free. In fact, I downloaded it, printed it, and keep it in a binder for easy reference! Let me know how your stir fry adventures go!
21-Day Tummy Recipe: Beef and Red Quinoa-Stuffed Eggplant

I’ve been doing pretty good about trying out some of the diet recipes this week, so here’s another one I tried, except that it was actually “Beef and Rice-Stuffed Eggplant.” If you haven’t noticed, I often sub (or forget) ingredients. This time, I used brown rice simply because I thought I had quinoa in the cupboard, but I apparently had used it all up. Ada is a huge quinoa fan, so I should’ve known we were out. I also forgot to add grapes because I was just way too excited to get to the part about stuffing the eggplant. Oh well.
Beef and Rice Quinoa-Stuffed Eggplant (A Phase 2 Recipe)
4 small eggplants (I used 3 to save some money.)
1 3/4 cups water
2 teaspoons extra virgin olive oil
1/2 cup instant brown rice
3/4 pound lean ground beef (I used a pound.)
1/2 teaspoon ground cinnamon (I reduced this greatly, probably by half, because none of us like a strong cinnamon flavor in savory dishes.)
3/4 teaspoon salt (I didn’t measure. I just added salt at various stages of the cooking process.)
1 can crushed tomatoes
20 red seedless grapes, halved (Again, I forgot these and just ate grapes on the side.)
1 Tablespoon chia seeds
Directions: (This is the way I did it, not the way it’s written in the original recipe.)
- Halve the eggplants. Scoop out the middle, leaving a slight edge. Dice up the scooped out eggplant.
- Placed the eggplant halves cut side down on a baking sheet. Add half cup water, and place in a 400 degree preheated oven. Bake for 15 minutes.
- While the eggplants are cooking, heat the oil, add the beef and season with some salt and cinnamon.
- Cook until brown and then add the eggplant and 1/4 cup of water. Cook for a few minutes before adding the rice, the tomatoes, and 1 cup of water.
- Bring to a boil. Cover, and simmer for 10-15 minutes. (After this, you would add the grapes if you wanted to.)
- Fill each of the eggplant shells with the beef and rice mixture. Bake for 10 minutes.
- Sprinkle with chia seeds.
I have to say that it was pretty good. For me, it was edible. Ada, as always, ate it up. CJ, who normally doesn’t eat what we’re eating, even ate most of his, and of course, my husband thought it was pretty good, too. He thought it probably needed the grapes, though, for sweetness, so although I’m not in a rush to try it again, it might be worth trying with the grapes and the quinoa, the way it was intended to be made.
Let me know if you try it, if you tried anything different, and how it went over at your house!
“Cod” with “Gremolata” Crust
Honestly, I had no idea what “Gremolata” was when I chose this particular fish recipe from the book Foods that Harm and Foods that Heal Cookbook: 250 Delicious Recipes to Beat Disease and Live Longer. (Apparently, it’s a parsley, lemon zest, and garlic mixture.) I really wanted to try one of the fish recipes for 21-Day Tummy diet since I had bought some frozen fish in preparation for the diet, but I didn’t have the necessary ingredients to do any of them. Most of them just say to bake the fish, and then the recipe is for the topping (salsa or chutney) to put on top. So I turned to another book that I got at the same time I picked up the 21-Day Tummy book since I had read about it a little also in Reader’s Digest
and went searching for a fish recipe that wasn’t for salmon and that I had most of the ingredients for.
I found “Cod with Gremolata Crust” (p. 203). I didn’t have cod, but I had tilapia. I didn’t have breadcrumbs, but I had Panko. I didn’t have a lemon that I could zest and get juice from, but I did have bottled lemon juice. I didn’t have plum tomatoes or a fresh zucchini, but I did have cherry tomatoes and some frozen shredded zucchini cubes. Close enough, so I made Tilapia with a Faux-Gremolata Crust.

I didn’t measure anything, so I’ll just tell you the steps I took:
- I preheated the oven to 425 since that’s what the packaging of the fish called for.
- I lined a glass baking dish with foil and then coated the foil with coconut oil.
- I placed 3 frozen tilapia fillets in the dish and salted them.
- I rubbed some Dijon mustard on top (much like I did with the pork chops the other day), drizzled on some lemon juice, sprinkled on some dried parsley and the Panko crumbs, and added a little paprika. (It had worked well with the pork chops, so I thought why not repeat?)
- I quartered the cherry tomatoes and spread them around. Then, I added a few zucchini cubes.
- I covered it with foil and put it in the oven. A few minutes later I realized I forgot to drizzle on some olive oil, so I took it back out, did that, and then returned it to the oven.
- I baked it for about 25 minutes.
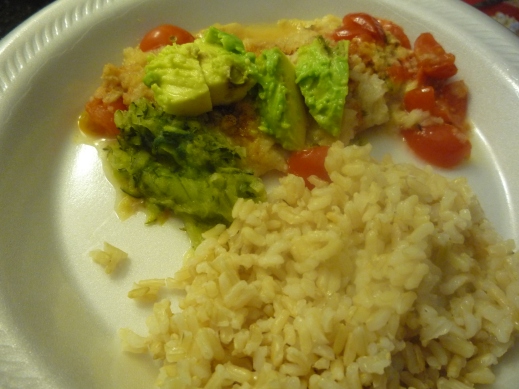
- While it was baking, I made some rice in the microwave to go with it. I also sliced up some avocado to put on top.
The verdict? Ada (16-months old) loved the tomatoes. She loved the avocado. She loved the rice. She ate some of the fish and didn’t throw it onto the floor, so overall, she seemed to like it. For CJ (6 years old) and me, it was not much of a hit. I scraped as much of the mustard off as I could and was able to eat it, and CJ only tried a tiny taste of each thing. We both ended up eating peanut butter and jelly sandwiches for dinner. When my husband got home, he ate what was left of it and said it was good…but he likes mustard.
So mixed reviews for this recipe. If you like mustard, you might like this recipe. I almost used Spicy Brown and then decided against it. Maybe it would’ve worked better?
Let me know if you try it and how it goes over in your house!
Trying 21-Day Tummy Recipes

As I mentioned before, I’m preparing for starting the 21-Day Tummy diet by buying some of the nonperishables and frozens ahead of time and by trying out some of the recipes from the book. The recipes I decided to try first were the smoothie recipes because during the first 5 days, you replace one meal, usually breakfast, with a smoothie. The first day, I made a chocolate, peanut butter, and banana smoothie recipe from the book:
In a blender mix
- 6 ounces of nonfat plain Greek yogurt
- 1 frozen banana
- 2 Tablespoons light coconut milk (I used unsweetened So Delicious brand.)
- 1 teaspoon of maple syrup
- 1 Tablespoon pumpkin seeds
- 1 teaspoon of peanut butter
- 1 teaspoon of unsweetened cocoa
- ice and water to get to desired consistency
It turned out to be a decent smoothie that I would probably repeat.
The second one I tried was a strawberry banana smoothie. I altered the recipe in the book a bit because it called for blueberries and strawberries and rather than having just a strawberry smoothie since I didn’t have blueberries, I replaced it with banana. It also called for almond butter, but I didn’t have any of it either (because it’s really expensive). So I just used peanut butter again. It also called for unsweetened cocoa, but I don’t like fruit and chocolate together. So I, instead, put a little ginger in.
- 6 ounces of nonfat plain Greek yogurt
- 1/2 banana
- 1/2 cup strawberries
- 2 Tablespoons light coconut milk (I used unsweetened So Delicious brand.)
- 1 teaspoon of maple syrup
- 1 Tablespoon chia seeds
- 1 teaspoon of peanut butter
- a touch of fresh grated ginger
- ice and water to get to desired consistency
Obviously, the combinations in the this smoothie are a little weird, but all the ingredients are belly buddies that help digestion. This smoothie (pictured above) was okay, too. Neither was as sweet as I usually make my smoothies, and the peanut butter taste really comes through, so it will take some adjusting. However, I think a smoothie every morning is definitely doable.

The other recipe I tried was “Mustard-Rubbed Pork Cutlet.” It’s not a true recipe from the book. It just gives these basic directions: “Spread 2 teaspoons Dijon mustard on top of a 4-ounce boneless center cut pork chop, sprinkle with a dash of salt and paprika, and roast in the oven…” And that’s exactly what I did x4. I didn’t know what temperature to cook it at or for how long, so I did 400 for 35 minutes. They were very well done, so I probably could’ve cooked them at a bit lower temperature or for a shorter time.
I was skeptical that I would like them because I honestly do not like mustard. However, they were absolutely delicious and super easy. I was feeling sick, tired, and had the biggest headache but was still able to quickly get them together and into the oven. Now, that’s a good recipe.
Let’s keep trying out recipes (and I’ll keep sharing some) and stocking up our kitchens for the 21-Day Tummy diet. Remember the goal is to start by the first of November. Honestly, I’ll probably start November 3rd, which is a Monday, so that I can use the weekend before to do some prep work. I’ll keep you updated!
